Hi guys... OK my project is is not Sci-fi but I think this place would be the best resource to ask!
I'm building the 1/350 Enterprise Aircraft Carrier and I've scratched built the Hanger Deck, and have a few more in the works for customers. I want to light it up Subtly... close to the real thing sort of.
I'm a newbie in electronics and I'm considering which would be more appropreiate : LEDs, LED strips, EL Wire , EL Panel..? Others?
Where should I buy which from?
The lighting itself would be installed on the otherside of the ceiling and the light would shine through the hundreds of square cut-outs to thus illiuminate the entire Hanger Deck...Subtly.
The Hanger deck is approximately 64cm long x 8cm wide x 2cm high (25" x 3.3" x 0.8")
The WIP is here
http://www.modelshipwrights.com/modules ... 458&page=1
Looking forward to your input.
THANKS!
Need help: Which Lighting product to use in my ship?
Moderators: Sparky, Moderators
-
Mr. Engineer

- Posts: 440
- Joined: Mon Dec 10, 2007 6:01 am
- Location: Malaysia
- Contact:
Hello, AngryDog,
That's a very nice model you have there! After looking at the pictures, there are only two possible solutions/theories I could think of (but the Experts here would have more) due to the limited thickness of the ceiling on the other side:
1) Eletroluminescent Sheets
These would probably be your best bet. They are as thick as, maybe a 100GSM paper and you need to do is to cut it to size (but leave a long tab for the connectors). Then, all you need to do would be to create lighting fixtures for the square holes, like a real lighting system. However, I am not sure how bright the interiors would be since EL sheets tend to "glow" and might possibly match the lighting intensity of a real life ship. All you need here is a wall-wart (adaptor), an inverter and the light sheet itself.
2) Surface Mount LEDs
This solution would give you a better light intensity and you can choose from a normal bluish white to warm yellowish white LEDs. But here is where the problem starts as these LEDs, although tiny, costs quite a bit and also, you would need to make a circuit board for them. The alternative would be to glue the LEDs to a thin board AFTER you have soldered them with tiny wires. Power consumption here would be a problem too as each LED takes up on average, 25mA.
Hi Mr Engineer,
Thanks for your commend on my BIG E and thank you for your reply.
I have to make multiple lighting systems .. for the BIG E in progress as well as for commissioned hanger decks.
I also have to light up the Island/Bridge very subtely too, but I want to concerntrate on the hanger lighting system first, then from there incorporate the Island's lighting to it if possible.
There's approximately 6mm of clearance between the hanger ceiling and the flight deck above.
Sorry I didn't mention that I did some light tests with individual white LEDs but the instensity caused "spotlight" effects resulting with hundreds of "squares" of lights on the deck. So I wondered if "soft" LED strips would work But..
Thinking of your advise, White EL sheets would probably be the best way to go.
The only problem (if any) would be that the "glow" would be very much like a real ship--but not bright enough to easily show off the hanger. If this was the case then I can locate a couple of White LEDs at areas not visible from the outside, at horizontal positions to brighten up the hanger a bit more. What do you think?
What exactly do you mean by
I will be using clear sheet between the square holes and Light source.
I was also thinking of adding a few rows of warm yellowish LEDs (as in the real ship) Can the EL sheet lighting system be connected to LEDs as well?
Surface Mount LEDs seem a bit intimidating.. since i have such a large area to cover.. I also have very little knowledge on electronics and I'd like to keep the cost down as much.
So looking at EL sheets... where's the best online sotre to get them and the parts required? What's their lifespan?
I'm in Singapore BTW...
THANKS!
Thanks for your commend on my BIG E and thank you for your reply.
I have to make multiple lighting systems .. for the BIG E in progress as well as for commissioned hanger decks.
I also have to light up the Island/Bridge very subtely too, but I want to concerntrate on the hanger lighting system first, then from there incorporate the Island's lighting to it if possible.
There's approximately 6mm of clearance between the hanger ceiling and the flight deck above.
Sorry I didn't mention that I did some light tests with individual white LEDs but the instensity caused "spotlight" effects resulting with hundreds of "squares" of lights on the deck. So I wondered if "soft" LED strips would work But..
Thinking of your advise, White EL sheets would probably be the best way to go.
The only problem (if any) would be that the "glow" would be very much like a real ship--but not bright enough to easily show off the hanger. If this was the case then I can locate a couple of White LEDs at areas not visible from the outside, at horizontal positions to brighten up the hanger a bit more. What do you think?
What exactly do you mean by
?all you need to do would be to create lighting fixtures for the square holes, like a real lighting system.
I will be using clear sheet between the square holes and Light source.
I was also thinking of adding a few rows of warm yellowish LEDs (as in the real ship) Can the EL sheet lighting system be connected to LEDs as well?
Surface Mount LEDs seem a bit intimidating.. since i have such a large area to cover.. I also have very little knowledge on electronics and I'd like to keep the cost down as much.
So looking at EL sheets... where's the best online sotre to get them and the parts required? What's their lifespan?
I'm in Singapore BTW...
THANKS!
-
Mr. Engineer
- Posts: 440
- Joined: Mon Dec 10, 2007 6:01 am
- Location: Malaysia
- Contact:
Dear AngryDog,
Ah, the 6mm clearance is good news indeed. But let me elaborate more as this is all theory. The fixtures I meant was that each square hole represents a light source and so, I assume you would be scratch-building a light, um, some kind of "pretend" housing for lights. You know, those square reflective boxes for fluorescent lights in the home or something like that.
The bad news is that although you can mix the LEDs with EL sheets, its not that simple. For one, to connect the LEDs, you would either get someone to make you a printed circuit board which the average thickness is about 1.6mm. And then you will solder the surface mount LEDs and the current limiting resistors onto it. (Forget the idea of soldering them by wires if you are not skilled wit a soldering iron.) And if you still want the EL sheets, you can glue them onto the same printed circuit board but you have to cut holes for the LEDs. And if the spotlight effect is too great, you might need to put a diffuser (such as 3M Scotch tape?) between the LED and the square opening.
Another bad news is the voltage required to supply these two different lighting systems. For an LED, you will have to convert 240volts AC to about 2 volts DC. Hence the Wall adaptor. For the EL sheets, you need an inverter to convert a DC source to AC voltage (bear in mind, if you accidentally touch the contacts, the experience is quite, um, shocking). If you want to combine them together, you might heed to cut out some holes in the EL sheet so that the LED would shine through. It is expensive but the end result might be what you need.
A quick Google search reveals a Singaporean company (http://www.nejilock.sg/product.htm). But I have to assume here that most advertising companies there do have this solution. So, the best bet is to take your model and ask them to demonstrate their EL system on it. But bear in mind, there is a slight problem about EL lighting that you must be aware of. Over time, their brightness would diminish and to minimise this, try not to make it too bright.
I would also like to suggest Sim Lim Tower for electronics components such as SMT LEDs but I am not so sure about this place anymore.
Pardon the illustration as this was the fastest I could come up with. Oh, the image is supposed to be upside down:
http://2.bp.blogspot.com/_oLfu8a9FNNQ/S ... ghting.jpg
(Had to re-edit as I think I'm not supposed to show pictures)
And so, you have a few combinations:
1) Hangar Roof, Frosted Acetate, SMT LEDs on PCB and Carrier Deck.
2) Hangar Roof, Frosted Acetate, Cut-out EL sheet, SMT LEDs on PCB and Carrier Deck.
3) Hangar Roof, Cut-out EL Sheet and Carrier Deck.
Hope this helps.
Hi again Mr Engineer,
Thanks again for the reply.
The hanger deck version I'm building is of the 1980s, on the real ship each square hole housed around 3 round lights. Simulating this would require optic fibre strands numbering 882 (3 x 294). 294 being the estimated count I did on the ships' square light cut outs.
So I decided on just illumination right out of those square holes.
The "pretend" housing you refer to may very well be done-if possible.. When i get a kit out for a post 1990's Enterprise hanger deck. This has those flourescent boxes.
Roger what you said.. so I won't mix EL sheet and LEDs. But your information is really enlightening! So if I install any LEDs as well, I'll have to do so with a separate system.
BTW, EL sheets can only be be powered via wall plug right? Not batteries? Again excuse my ignorance.
Also, assuming I use LEDs instead of EL sheet, for the number required for the hanger deck, will a battery pack work instead of wall plug?If so,how long?
I came across Nejilock today, (for some reason I didn't think of googling locally!) I'll call them for further information, and will let you guys know the outcome as well.
I did check out Sim Lim Tower before, yes they are just about the same (when did you come here BTW?) However, I think they can be more helpful - when they know what I need! Thus I'm on this post to get my facts together.
Your illustration is great BTW! Puts my thoughts into perspective!
I recall seeing those SMT LEDs on strips..
So looks like my options are getting more defined now:
1) Hangar Roof, Frosted Acetate, EL sheet, and Carrier Deck.
3) Hangar Roof, Frosted Acetate, White and Amber SMT LEDs Strips, and Carrier Deck.
looking forward to your reply..
-
Madman Lighting
- Posts: 1818
- Joined: Sat Mar 05, 2005 9:16 am
- Location: Serenity.
- Contact:

False and false...Mr. Engineer wrote: 2) Surface Mount LEDs
This solution would give you a better light intensity and you can choose from a normal bluish white to warm yellowish white LEDs. But here is where the problem starts as these LEDs, although tiny, costs quite a bit and also, you would need to make a circuit board for them.
First, you can get white LEDs in surface-mount sizes for no more than you'd pay for traditional through-hole sizes like 3mm and 5mm. Mouser has 'em for between $0.20 and $0.60 each, depending on the particular specs you're after.
Second, you don't need a circuit board for surface-mount LEDs. You just need to have eyesight good enough to solder wires to 'em. :) They're also dreadfully easy to lose - put one down somewhere, look away, look back, it's gone. You don't even need a "carpet monster" to lose a small-size SMD LED like 0603: dropping it on the floor would be plenty. The way you deal with that is to attach at least one wire to it before you lose it. If you can do that, then it's easy enough to find it again.
My usual approach is to wrap a rubber band around needle-nose plier handles, then grab the LED with it, solder a wire to one side, reposition the LED if necessary, and then solder a wire to the other side. Then the LED can be installed where it's needed and the wires connected to something useful. I have lost plenty of SMD LEDs along the way - but the upshot is I can squeeze a light into a model almost anywhere.
Certainly using SMD components is a lot easier if you have a board - but I regularly use surface-mount LEDs in projects. Learning to work with them is just a skill you develop, like any other in this hobby.
---GEC (三面図流の初段)
There are no rats.
The skulls eat them.
There are no rats.
The skulls eat them.
-
Adam Baker
- Posts: 130
- Joined: Sat Jul 26, 2003 9:37 pm
- Location: Gastonia, NC
- Contact:
-
en'til Zog
- Posts: 2405
- Joined: Fri Jul 12, 2002 3:03 pm
- Location: The Wilds of Northwoods Wisconsin
Tetsujin,
In regards to "costs"...Which online store can I get those 3mm and 5mm SMD LEDs already on strips ? (the flat square ones you're referring to as in the link) I'm comparing prices internationally and locally.
http://wintech.com.sg/shop/product_info ... cts_id=153
Is there another option besides soldering? I fear it won't be time effective for me to do such multiple soldering for individual ones, especially since I have to prepare multiple sets as I am making many hanger decks.
However,your advise is noted as I can certainly forsee future projects which require just a few of those tiny lights. THANKS!
Adam,
If you're going to get your BIG E done similar to what I'm doing, take a look at my post for the Details
http://www.modelshipwrights.com/modules ... 615&page=1
I have begin commission work on multiple hanger decks @ $260(which will include the lighting kit of course)
And for those who want to tackle it themselves.. the alternative is to wait for my DIY hanger kit - which will include "plans" of templates, measurements, list materials to use, and some detail resin parts, etc. Available in a couple of months from now. I am considering whether or not to include the lighting material (precut and wired EL sheet or the LED version) thus my posting here to sort this all out to get the best lighting system at the best cost.
en'til Zog
Yes I'm looking into those flat square LEDs on strip board, so no soldering for the individuals involved.. more costly though.
http://wintech.com.sg/shop/product_info ... cts_id=153
-
Chacal

- Posts: 3654
- Joined: Fri Jul 12, 2002 3:09 pm
- Location: Rio. Always unseasonably warm, even in the Winter, when we'll host the Summer Olympic Games of 2016
How about a sheet of edge-lit plexiglass? Gang enough hi-intensity LEDs on the edge, roughen the 'fixtures' on its surface and you may have the effect you need, at low cost (comparatively), without the need for EL sheets or SMT LEDs.
Sheer elegance in its simplicity.
Political unrest in dictatorships is rather like a round of rock-paper-scissors: The oposition goes on denouncing the regime on the papers, the regime censors the papers, rock-throwing ensues.
Political unrest in dictatorships is rather like a round of rock-paper-scissors: The oposition goes on denouncing the regime on the papers, the regime censors the papers, rock-throwing ensues.
-
Mr. Engineer
- Posts: 440
- Joined: Mon Dec 10, 2007 6:01 am
- Location: Malaysia
- Contact:
Dear AngryDog,
Wow. For that striplight, USD12.00 is cheap but I am more concerned in terms of the distance between each soldered LED in the strip not matching your template. I also just found out that EL can be sold in strips too, so you do not need to use the whole sheet, thus cutting down cost.
Furthermore, I am hoping EL would be the solution of choice and workable theory too soldering 243 LEDs is a nightmare, be it on wires or circuit boards. Not only that, I have found out from the shops I frequent, the stripboards have an average length of about 6 inches and so, you would need to join a lot of stripboards. But if you're only using EL alone, you would not need the frosted acetate as it is used to diffuse the LEDs to prevent them from creating spots on the deck floor..
And Madman is right on the EL point. The word I was looking for (and forgot) was even lighting (uniform intensity?)
Where I am, the closest we ever have to Mouser is RS Catalogue and Farnell. And because of that, I based my reply on my experience with the shops here. I just found out that Mouser charges USD40.00 just to ship to my house, and that is excluding paying tax to the greedy Customs. The SMT LEDs I get here, is competitively priced but they come in batches of 500's or less. Which means, the batch that comes in this time is different or more expensive than the last batch and if I happen to purchase them in between the batches, I am out of luck. However, AngryDog might be luckier than me as whatever resources he wants, is easily available in Singapore. And cheaper too. Heh.
Anyway, all this is just theory since I do not have the luxury to get that model and put it into practice (But I am very interested now) since I will be looking for a new job this January, no thanks to the Economy.
Still, I am worried that EL for this project, might not be as bright as LEDs. But its quick and simple where you need to make more than one set.
Hi Chacal,
The problem would be cutting the plexiglass..I've only 6mm clearance...
It is however applicable to other projects I can imagine. Thanks.
Dear Mr Engineer,
That's US$8.70 (SG$12)! I believe cheaper if you can get the longer strips or buy from wholesale.
Electronic components are very cheap here.. But you'll need to know what you're looking for and do your homework with sourcing out wholesalers/distributors and comparing prices. For an electronics idiot like myself...I've to do a crash course to get the knowledge within my limited free time.
I have decided against the idea of each LED per square hole, as I learned the hard way over the years as a full time model builder, that although I spent many hours of research and work to detailing and replicating...it is not thoroughly noticed and sometimes not really appreciated. Not to that equal level anyway. So some compromise is justifiable.
As for soldering circuit boards and wires, sends a shiver down my spine.. I do solder, like the Slat armor for the Stryker but I hope I can stay away from that in regards to electronics as long as possible!..Probably not!
It's great that EL can be cut, and I also found out via phone that they can be connected. I'm excited to get down to Nejilock, I just hope the whole set up doesn't cost too much.
What you and madman said is also my main concern, and I believe EL will be the likely solution of uniform glow preventing the light spots on the deck floor..
I need to get 3 kits myself
The problem would be cutting the plexiglass..I've only 6mm clearance...
It is however applicable to other projects I can imagine. Thanks.
Dear Mr Engineer,
That's US$8.70 (SG$12)! I believe cheaper if you can get the longer strips or buy from wholesale.
Electronic components are very cheap here.. But you'll need to know what you're looking for and do your homework with sourcing out wholesalers/distributors and comparing prices. For an electronics idiot like myself...I've to do a crash course to get the knowledge within my limited free time.
I have decided against the idea of each LED per square hole, as I learned the hard way over the years as a full time model builder, that although I spent many hours of research and work to detailing and replicating...it is not thoroughly noticed and sometimes not really appreciated. Not to that equal level anyway. So some compromise is justifiable.
As for soldering circuit boards and wires, sends a shiver down my spine.. I do solder, like the Slat armor for the Stryker but I hope I can stay away from that in regards to electronics as long as possible!..Probably not!
It's great that EL can be cut, and I also found out via phone that they can be connected. I'm excited to get down to Nejilock, I just hope the whole set up doesn't cost too much.
What you and madman said is also my main concern, and I believe EL will be the likely solution of uniform glow preventing the light spots on the deck floor..
Once I check out Nejilock and some other LED shops here, I will come back to let you guys know about pricing. You'll be able to see if it's more cost effective to get it from here directly from them or through me. I can help out.However, AngryDog might be luckier than me as whatever resources he wants, is easily available in Singapore. And cheaper too.
Good luck with getting a new job later. BTW, if you want the Enterprise, wait for the sales at www.luckymodel.com The ship will cost around US$100 (usual price $140) and shipping to the US at $50. Buy more stuff combine shipping..Anyway, all this is just theory since I do not have the luxury to get that model and put it into practice (But I am very interested now) since I will be looking for a new job this January, no thanks to the Economy.
I need to get 3 kits myself
I don't really know about where to get strip lights - I never use them...
For regular, leaded LEDs you could do wire-wrap - but then you're limited to larger LEDs...
If I were to attempt lighting this hangar deck with individual surface-mount LEDs, I guess the way I'd do it is arrange the LEDs in a big matrix grid - to simplify the process of wiring them, I'd have rigid steel wires going down the length of the ship - in lieu of a circuit board to mount the LEDs onto (having one made would be pretty expensive) the rigid steel wires would provide much-needed structural support... one terminal of each LED would be soldered onto one of the steel wires - care would be needed to make sure the LEDs' positions would correspond with the holes in the ceiling... With the steel wires forming "columns" I'd then connect the other terminal of each LED into "rows" using wire. The entire grid could then be driven by a LED driver IC... The LED driver would basically scan through the matrix, lighting up one "row" at a time...
Alternately, each "column" could be made as a giant series circuit - the way I'd do that is to have two steel wires per "column" - connect one wire to each terminal of each LED on the column, but stagger the polarity of the LEDs - and then cut out alternating sections of the two wires to form a sort of square wave pattern... This arrangement would require a higher voltage power source but it would be more power-efficient with less power wasted on series resistors... This would also make it easier to avoid the need for a driver IC.
But I guess the cost of 200-something LEDs does add up: $60 if the LEDs are $0.30 each...
The main trick, if you were to light the space with LEDs (but a smaller number of them) would be distributing and orienting the light properly. Ideally what you want is a more-or-less equal amount of light coming through each hole in the ceiling, and the light coming through to be mostly straight down but be diffused enough that you get more of a "general lighting" rather than a bunch of spots... If each aperture had a frosted-clear "window" in it, then you might be able to get a decent effect by painting the interior of that 7mm clearance you've got flat white, lighting the hell out of it (I'd guess 10-20 non-SMD white LEDs could be adequate for this) - but in such a way that none of the LEDs shines straight at an aperture... The LED light will rebound off the white surfaces and disperse - the return that actually comes through the apertures will be diminished a bit by two or more diffuse reflections off these surfaces - so for this to work the LEDs will really have to blast, and that area of the model will have to be sealed against light leaks...
Edge-lit plexi like Chacal mentioned could also work - this is how the lights built in to certain types of LCD screen work - light blasts in from the sides, and the rough surface of the clear "light guide" distributes the light over the surface of the screen... But I don't know where you buy such things.
I haven't worked with EL lighting - the limited output has generally been its main limitation but that may be less of a problem these days... But since this hangar deck is enclosed, you may not need a huge amount of light output anyway. All you really need there is enough light so that anybody who peeks inside can see that there's cool stuff in there.
For surface-mount LEDs, not really. You have to solder something to them, or them to something, before using 'em...AngryDog wrote: Is there another option besides soldering?
For regular, leaded LEDs you could do wire-wrap - but then you're limited to larger LEDs...
If I were to attempt lighting this hangar deck with individual surface-mount LEDs, I guess the way I'd do it is arrange the LEDs in a big matrix grid - to simplify the process of wiring them, I'd have rigid steel wires going down the length of the ship - in lieu of a circuit board to mount the LEDs onto (having one made would be pretty expensive) the rigid steel wires would provide much-needed structural support... one terminal of each LED would be soldered onto one of the steel wires - care would be needed to make sure the LEDs' positions would correspond with the holes in the ceiling... With the steel wires forming "columns" I'd then connect the other terminal of each LED into "rows" using wire. The entire grid could then be driven by a LED driver IC... The LED driver would basically scan through the matrix, lighting up one "row" at a time...
Alternately, each "column" could be made as a giant series circuit - the way I'd do that is to have two steel wires per "column" - connect one wire to each terminal of each LED on the column, but stagger the polarity of the LEDs - and then cut out alternating sections of the two wires to form a sort of square wave pattern... This arrangement would require a higher voltage power source but it would be more power-efficient with less power wasted on series resistors... This would also make it easier to avoid the need for a driver IC.
But I guess the cost of 200-something LEDs does add up: $60 if the LEDs are $0.30 each...
The main trick, if you were to light the space with LEDs (but a smaller number of them) would be distributing and orienting the light properly. Ideally what you want is a more-or-less equal amount of light coming through each hole in the ceiling, and the light coming through to be mostly straight down but be diffused enough that you get more of a "general lighting" rather than a bunch of spots... If each aperture had a frosted-clear "window" in it, then you might be able to get a decent effect by painting the interior of that 7mm clearance you've got flat white, lighting the hell out of it (I'd guess 10-20 non-SMD white LEDs could be adequate for this) - but in such a way that none of the LEDs shines straight at an aperture... The LED light will rebound off the white surfaces and disperse - the return that actually comes through the apertures will be diminished a bit by two or more diffuse reflections off these surfaces - so for this to work the LEDs will really have to blast, and that area of the model will have to be sealed against light leaks...
Edge-lit plexi like Chacal mentioned could also work - this is how the lights built in to certain types of LCD screen work - light blasts in from the sides, and the rough surface of the clear "light guide" distributes the light over the surface of the screen... But I don't know where you buy such things.
I haven't worked with EL lighting - the limited output has generally been its main limitation but that may be less of a problem these days... But since this hangar deck is enclosed, you may not need a huge amount of light output anyway. All you really need there is enough light so that anybody who peeks inside can see that there's cool stuff in there.
---GEC (三面図流の初段)
There are no rats.
The skulls eat them.
There are no rats.
The skulls eat them.
Tetsujin,
Besides locally for the EL sheet here, I found online stores that have the strip version.
http://cgi.ebay.com/Glow-Belt-strip-Toy ... 3efb336f64
The wire-wrap for LEDs would be how I go...hate soldering.
I won't do individual surface mount LED soldering, not for this project anyway. But that's a good tip with using rigid steel wires..
If I'd go LED instead of EL sheelt..then from what I've been reading--I'd use frosted sheet between the holes and light source. Either get "10-20" non SMT LEDS or the already soldered SMT LED strips and place them not directly at the "holes" but between them for distribution,bounching light back as well from above ceiling (advantage of the 6mm clearance) which where I would stick "tin foil" or the like for reflection.... very much like you said -- diffuse, distributed and uniform lighting...like you said..
Next week I'll check out the EL lights and the LED company here as well.
Soooo many choices to figure out...
That's the point..just hope I find the easiest and most cost effective way!All you really need there is enough light so that anybody who peeks inside can see that there's cool stuff in there.
Well, some of that last post was also me trying to brainstorm how I might tackle your particular challenge... Just exploring possibilities, some of it's for my own benefit. :)AngryDog wrote: The wire-wrap for LEDs would be how I go...hate soldering.
I won't do individual surface mount LED soldering, not for this project anyway. But that's a good tip with using rigid steel wires..
Soldering can be a pain sometimes - to me, the main issue is when a bunch of things need to be soldered together but there's no physical structure lending it stability. The resulting circuit is flimsy (until you mount it, that is) and prone to breakage (because the solder joints wind up getting flexed)... Using circuit boards for as many components as possible certainly helps, but it's good to have other solutions, too... I've never tried the steel wire trick I mentioned - I'll have to see how it works out... :)
---GEC (三面図流の初段)
There are no rats.
The skulls eat them.
There are no rats.
The skulls eat them.
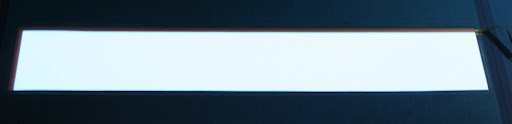
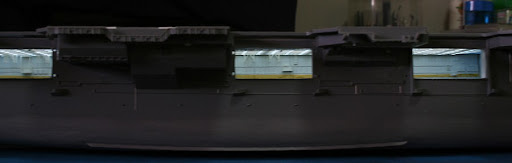
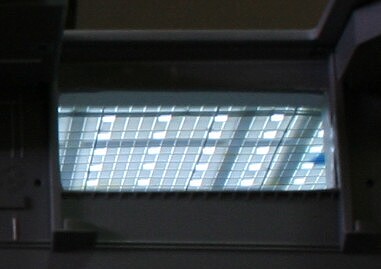
Hey guys, I'm going with customized EL panel, brought my hanger deck down and did some test at the company... I like the effect. The system should be ready for collection next week and I'll post photos of the outcome.
I may have to use a couple White LEDs at strategic locations for further brightening if my clients want to...see more. These will be hooked up to another battery pack since it's required for the lighting of the Island anyway.
Reason I chose EL panel is because it simulates the subtle uniform illumination as compared to LEDs. Hangers being dimly lit and other aspects such as the ease of use and installation, sold me on it. Although definately much uch more costly than LEDs... but it's the Realism that matters most.
You can read the details at my post..
http://modelshipwrights.kitmaker.net/mo ... 497&page=1
-
Mr. Engineer
- Posts: 440
- Joined: Mon Dec 10, 2007 6:01 am
- Location: Malaysia
- Contact:
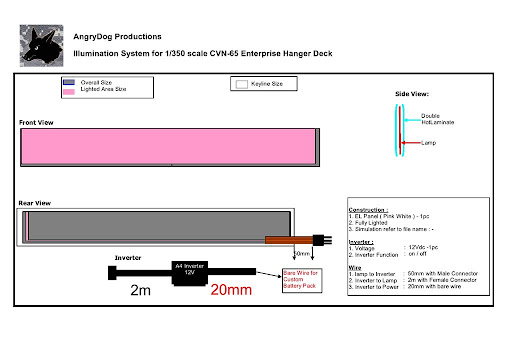
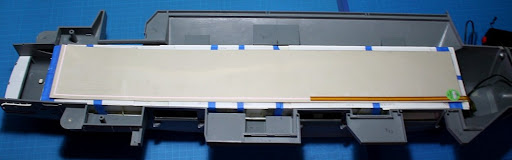
Before the real thing is in my hands... This is from the Company, but with my Biz details..
Measurements are removed for copyrite purposes.
ok here's the link http://lh5.ggpht.com/_VkewxtItgMs/S5UHC ... IG%20E.jpg
Measurements are removed for copyrite purposes.
ok here's the link http://lh5.ggpht.com/_VkewxtItgMs/S5UHC ... IG%20E.jpg
Last edited by AngryDog on Mon Mar 08, 2010 10:29 am, edited 2 times in total.
-
USS Atlantis

- Posts: 2388
- Joined: Sat Sep 08, 2007 6:44 pm
- Location: Galaxy 217, Orion Arm, Sol System, Sol III, 44° 53' N 93° 13' W (Local coordinate system)
- Contact:
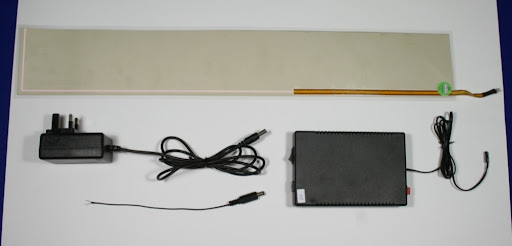
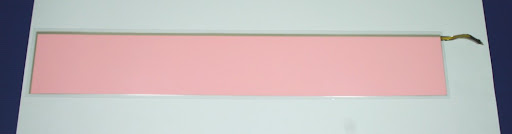
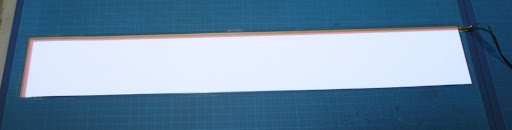
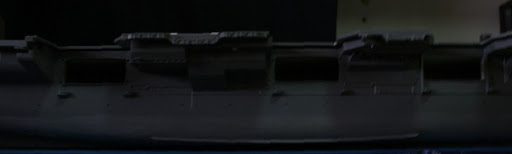
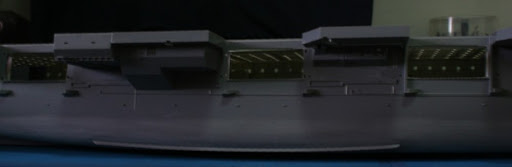
Got the Lighting System Today..!
If you want more info see my post
http://www.modelshipwrights.com/modules ... 497&page=1
Parts:
http://lh4.ggpht.com/_VkewxtItgMs/S6tMq ... /Parts.jpg
http://lh6.ggpht.com/_VkewxtItgMs/S6tL- ... 20side.jpg
http://lh4.ggpht.com/_VkewxtItgMs/S6tMV ... nected.jpg
Lit :
http://lh6.ggpht.com/_VkewxtItgMs/S6tL- ... ghting.jpg
http://lh5.ggpht.com/_VkewxtItgMs/S6tMq ... G_1996.jpg
Hanger unlit and lit :
http://lh6.ggpht.com/_VkewxtItgMs/S6tMq ... %20off.jpg
http://lh6.ggpht.com/_VkewxtItgMs/S6tMW ... 20test.jpg
EL positioned in Hanger :
http://lh5.ggpht.com/_VkewxtItgMs/S6tL- ... tioned.jpg
Unlit and Lit with Carrier's Flight Deck removed and also installed :
http://lh3.ggpht.com/_VkewxtItgMs/S6tMW ... talled.jpg
http://lh5.ggpht.com/_VkewxtItgMs/S6tMW ... emoved.jpg
http://lh5.ggpht.com/_VkewxtItgMs/S6tMq ... talled.jpg
Shot of ceiling lit
http://lh6.ggpht.com/_VkewxtItgMs/S6tL- ... eiling.jpg
Close up
http://lh5.ggpht.com/_VkewxtItgMs/S6tMq ... ng%201.jpg[/url]
-
Mr. Engineer
- Posts: 440
- Joined: Mon Dec 10, 2007 6:01 am
- Location: Malaysia
- Contact:
-
admiralcag

- Posts: 975
- Joined: Fri Jun 20, 2003 6:46 am
- Location: Arvada, CO