Zubie wrote: ↑Sun Mar 29, 2020 9:18 pm
Richard Baker wrote: ↑Sun Mar 29, 2020 2:29 pm
I am trying to find the Boolean function for adding/subtracting one object from another.
Let's say for example I have a cube and a cylinder. I want to intersect the cube with the cylinder and subtract the cylinder, leaving a round hole through the cube.
Just gotta upload the pics and be right back.
Ok...Back. First one starts with a set of objects on your field. Note this only works with separate objects, not multiple meshes identified as set of objects. This is a particularity of Blender. If you are in
"Edit" mode, any mesh you add is part of the same object whether contiguous or not. Only in
"Object" mode are new meshes different objects.
(note I generally won't post large img, but this was the smallest compression)
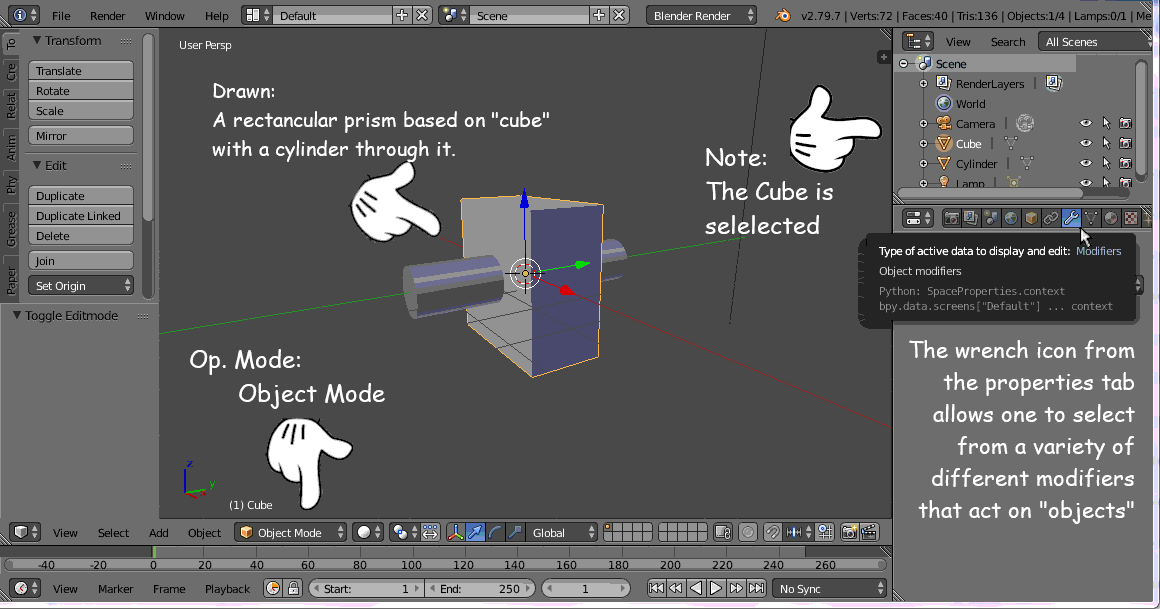
This is pretty much the default view of my version of Blender (2.79). I've minimized the 3d view's properties listing for a clearer view. As noted, I first inserted a rectangular prism in the world, then as a separate object a cylinder through the middle. In object mode you can see I've selected "Cube" (which was the parent mesh) and then one needs to go to the properties list and select modifier which is the wrench icon.
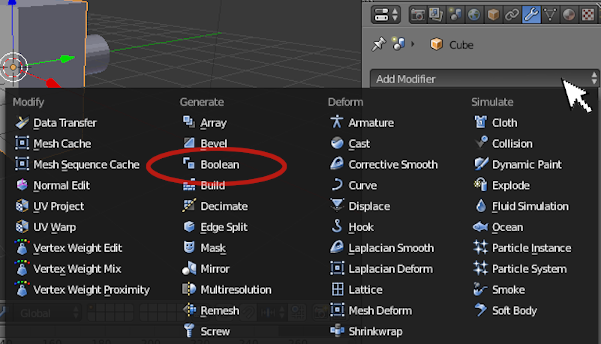
I've circled the "Boolean" operations off the modifier list. There are some interesting ones there, but so far I've only played with Boolean.
Once selected, you will a couple of buttons and a couple of drop down menus. The two drop downs pertain to what operation you want, and what object you want to use relative to that operation. This will only function in "Object" mode. Only 3 operations are available: Intersection, Union, and Difference.
Intersection will look at the faces that interact between the two chosen objects. The result will be applied to the chosen object, not to the one that it is interacting with. Once you have chosen what object will be the one that interacts with it, Blender previews the result. In this case, only the section of the box that actually interacts with the cylinder will be left - the cylinder segment that runs through the inside.
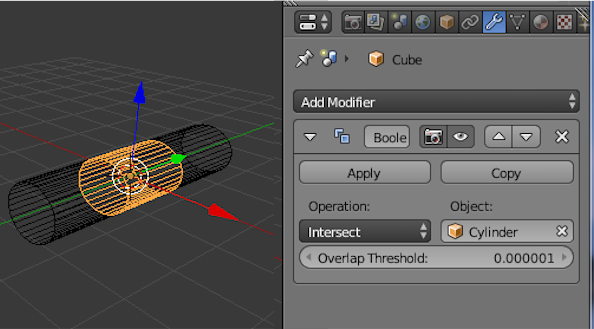
I've left the view in wireframe mode to see what is going on more clearly (this is generally the best way - sometimes I make the "cutting" object invisible all together). The highlight would be the result of the operation, the operation though is not final until you hit apply. If you switch out of object mode to edit the result will not stick, but Blender will hold this operation in the object's modifier operation property list so you can get back to it.
Union will combine the two objects into one. Curiously I don't think I've tried this with object that don't touch so I can't say absolutely what would happen then.
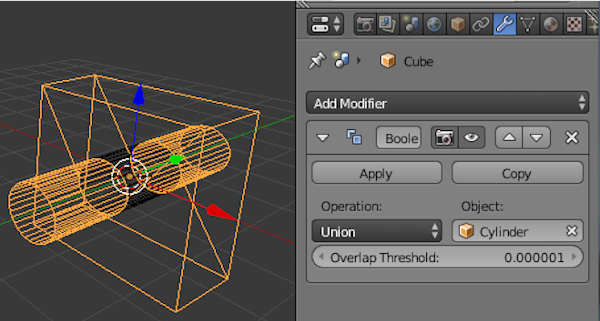
You can see here the object has been highlighted is the prism with the outer ends of the cylinder. This has created a rectangular prism with 2 cylinder's sticking out the front and back face. Note it also resulted in splitting the face on each side (diagonal edges on the flat faces). This should also indicate the mechanism needed to create a cross out of two long rectangular boxes.
Difference is best expressed as the opposite of Union as used here. It is in a sense the Union of the intersection with the interacting object.
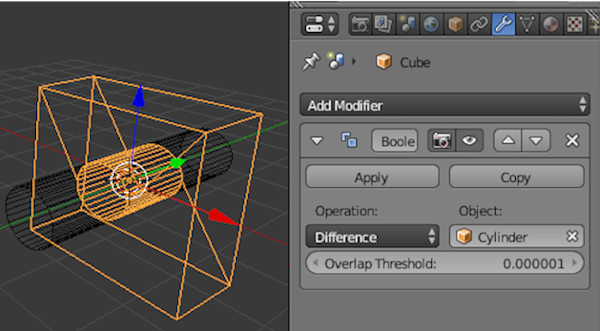
You can see above that the box is now highlighted with the internal cylinder section that was actually through the inside of the box. If I hit apply at this point, the object will permanently get the hole stamped through. The operation will also be removed from the list of active modifiers as it has been executed. One could in theory work out quite a few modifiers and keep them on the list until you actually decide to do anything with them.
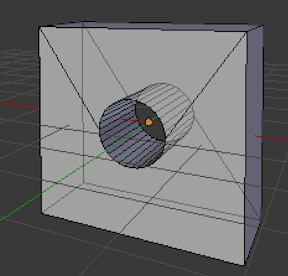
Operation done
From experience I've learned that "Undo" in Blender is not the same as Undo in other editors. There are 2 separate Undo lists, those under "Object" mode and those under "Edit". The edit ones only exist for any individual edit sequence, and object exists outside of all edit sequences. Since Modifiers are part of the Object sequence you can Undo a modifier op in Object mode, but be careful because edit sessions also fall under that list so you can undo an entire mesh edit session with just 1 "undo". Personally if I intend to undertake some complicated modifier ops, I tend to save the file first and "revert" to file as an Undo as what is actually going to happen is clearer in my head. (Note:you can even quit Blender if you undo in Object mode enough times without a "save" warning, so again beware).
I would like to say that these ops are always that consistent but they are not. I haven't tried it with more sophisticated spline surfaces so no comment there. I also know it tends to not work with 2d objects such as squares or circles (but will with a square face of a cube parent). I think some of it is affected by the actual "normal" vectors on each face since these define the "inside" and "outside" of objects. Curiously enough extensive editing involving the creation and deletion of faces on an object can result in normals pointing in weird directions (this is sometimes perceivable as face shading that looks out of place with adjacent faces). Sometimes it just does weird things and definitely a place where the preview comes in handy. It has occasionally failed on me, typically with objects I've very heavily modified. Another thing is that these operations quite frequently will add useless vertices, duplicates, and odd joins that can have an effect if you plan to "unfold" the surface. Your object may require "clean up" afterwards.
Hope that helps

 (note I generally won't post large img, but this was the smallest compression)


 Operation done
